Drop a Wavefront .obj, keep millimeters as the default, read the bounding box and triangle count, then download a slicer-ready STL. The file never leaves your device. No signup.
Your mesh stays on this device. It is not uploaded. Conversion runs in your browser.
Textures, MTL libraries, and UVs are ignored. You get triangles for a slicer.
File: No file chosen
Drop an OBJ when you are ready.
Triangles
—
Objects
—
Bounding box
—
Min — · Max —
Sizes are millimeters. STL does not store a unit; slicers usually read 1 unit as 1 mm.
No account. The download is never blocked.
Preview
Drag or middle-drag to orbit. Shift-drag to pan. Scroll to zoom. Z is up. Drop an OBJ to put it on this grid.
This page converts a Wavefront OBJ mesh into an STL you can open in a slicer. The work happens in the tab you already have open. There is no account, no paywall, and no upload step. Materials and texture maps stay behind. What you download is a triangle shell, binary by default, with a bounding box you can read in millimeters before you print.
How it works
OBJ → parse → apply source-unit scale → optional preview → binary STL download. The steps below match the converter on this page.
Step 1
Drop a Wavefront OBJ
Choose a .obj mesh from your computer or drop it on the converter. The file is read locally. Textures and MTL files are ignored.
Step 2
Set units to millimeters
Leave units on millimeters unless you know the OBJ was saved in centimeters, meters, or inches. Add a scale factor only when the mesh needs a deliberate resize.
Step 3
Read the bounding box and triangle count
Confirm the size in millimeters and the triangle count before you print. STL itself does not store a unit.
Step 4
Preview only if you want to
The preview is a grid you can orbit, pan, and zoom before you drop a file. After the OBJ is parsed, the mesh appears in that same view. The preview is not required to build the STL.
Step 5
Download the binary STL
Save the binary STL. No account is required and the download is not gated. ASCII STL is available under advanced export.
Step 6
Open the STL in a slicer
Import the STL into Bambu Studio, UltiMaker Cura, or PrusaSlicer and confirm the size on the bed before you slice.
Privacy: conversion stays in your browser
The converter reads the file with the browser File API and hands a copy of those bytes to a Web Worker. The worker runs the OBJ parse and the STL export. The finished STL is a Blob on your machine. The download button saves that Blob. It does not POST the mesh anywhere.
Open the browser developer tools, choose the Network panel, and drop an OBJ. You should not see a request to this site, or to anyone else, whose body is your mesh. The only mesh this origin serves is the small sample cube, and only if you press “Load 10-unit sample cube.” Your own file is not that request. Mesh bytes do not go to the site origin.
The page can emit three local events — file_drop, parse_ok, and download_stl — with the file size, unit choice, and triangle count. Those events stay in the page. They do not include the file name or the mesh, and this launch build does not send them to an analytics host. The full write-up is on the privacy page.
Units and scale
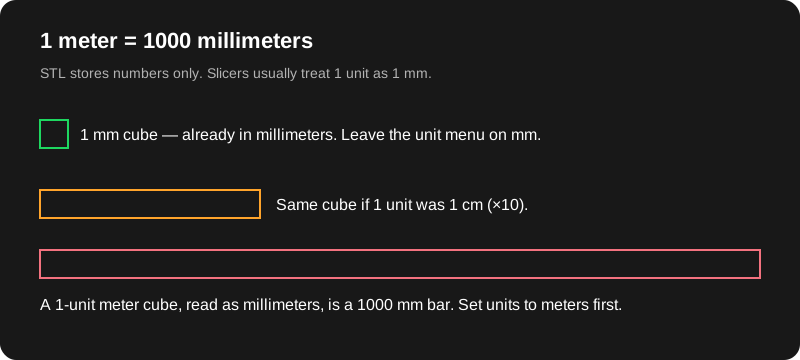
STL is unitless. A slicer such as Bambu Studio, UltiMaker Cura, or PrusaSlicer almost always treats one coordinate as one millimeter. If Blender (or a CAD mesh export) stored the OBJ in meters, a 80 mm figurine that was modeled as 0.08 will slice as 0.08 mm. The other direction is the classic 1000× giant: a 1 meter scene unit becomes a 1000 mm part.
The unit menu answers “what was 1 unit in the OBJ?” Millimeters leave the numbers alone (default). Centimeters multiply by 10. Meters multiply by 1000. Inches multiply by 25.4. Extra scale is a second multiplier, default 1, for a deliberate resize on top of that. The bounding box then shows the size the slicer should see, in millimeters, plus the min and max corners, and the triangle count.
Blender’s OBJ export is usually Y-up. Slicers are Z-up. The default axis option rotates Y onto Z so a standing model still stands. If you already exported Z-up, pick “Z up already” so the mesh is not rotated twice. “Sit the mesh on the bed” shifts Z until the lowest point is 0. Turn that off when you need the original origin. A longer explanation, with the meter footgun drawn out, is in units mm vs meters.
Binary vs ASCII STL
Binary STL stores each triangle as packed numbers. ASCII STL writes the same corners as text. For a real print, binary is smaller, faster to save, and what slicers expect. The download button uses binary unless you check “Export ASCII STL instead.” ASCII is the right pick when you want to open the file in a text editor and read a few vertex lines. It is a poor pick for a dense sculpt. See binary vs ASCII STL for the byte layout and when text still helps.
What gets dropped
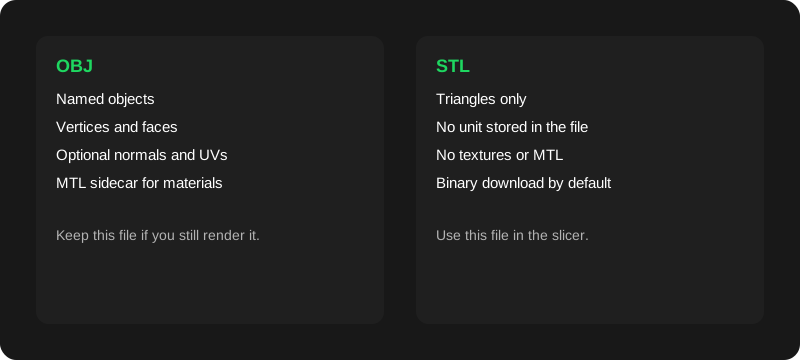
An OBJ can carry several objects, smoothing groups, UVs, and a sidecar MTL file that points at textures. STL keeps triangles. This tool merges mesh objects into one solid, bakes their vertex positions, and ignores materials. Colors do not survive. Hierarchy names do not become separate STL files. If the OBJ is the asset you still render, keep it. Use the STL as the print file. The decision is spelled out in OBJ vs STL, with primers on what an OBJ file is and what an STL file is.
Print workflow
In Blender, apply scale (Ctrl+A → Scale) so object scale is 1 before you export. File → Export → Wavefront (.obj). For a millimeter scene, leave this converter on millimeters. For a meter scene, choose meters. Download the STL, then import it in Bambu Studio, UltiMaker Cura, or PrusaSlicer and read the dimension tool before you slice. If the part is 1000× off, change the unit here and export again. Do not “fix” a meter-scale mesh by typing 1000% in the slicer and also scaling here. Pick one place.
The walk-through with those three slicers is how to convert OBJ to STL. Nothing in that path requires an account on this site. This is mesh OBJ only — not image→STL, and not STEP.
Limits
Hard size gate: 40 MB per OBJ. Larger files stop with a Blender decimate tip, before parse.
Very dense meshes under 40 MB can still exhaust the tab. The error tells you to close tabs or decimate.
Empty or invalid meshes fail with a clear parse error. The optional preview skips meshes above 400,000 triangles. The STL is still the full mesh.
Conversion is not manifold repair, hole filling, or a wall-thickness check.
STEP and STP are not supported. Export a mesh OBJ from the CAD tool first.
PNG, JPG, and other images are not turned into STL here.
One OBJ at a time. Batch zip, FBX, GLB, and STL-to-OBJ are not in this version.
These answers match the converter that is on this page. Explicitly: no image→STL, and we do not convert STEP; export a mesh OBJ first.
Is my OBJ file uploaded?
No. Your browser reads the file and a Web Worker on the same device parses it and builds the STL. The mesh is not sent to objtostl.com, and there is no upload API. After a conversion, the Network panel should show no request whose body is your OBJ or STL. Loading the built-in sample cube is a normal page asset, separate from your own files.
Why is my print 1000× too big or too small?
STL does not store units. Slicers usually treat one coordinate unit as one millimeter. If the OBJ was modeled in meters, a 0.1 meter part becomes 0.1 mm unless you scale by 1000 first. Set the unit dropdown to match the file, then read the bounding box in millimeters before you download.
Do textures, colors, or MTL files come through?
No. This converter keeps triangle positions only. Materials, MTL libraries, UVs, and vertex colors are ignored. If you still need the textured OBJ for rendering, keep that file and use the STL only for slicing.
Will the STL be watertight?
Not guaranteed. Conversion copies triangles into STL. It does not stitch holes, fix flipped faces, or make a mesh manifold. If a slicer warns about a non-manifold mesh, repair it in your modeling tool. A successful download is not a printability guarantee.
Should I download binary or ASCII STL?
Binary is the default. It is much smaller and is what Bambu Studio, Cura, and PrusaSlicer expect. ASCII STL is plain text, useful when you want to inspect coordinates in an editor. Both describe the same triangles when the unit settings match.
What is the maximum file size?
40 MB per OBJ. Larger files stop before parse, with a note to decimate or export a smaller selection from Blender. Very dense meshes under the limit can still run out of memory in the tab. Close other tabs or reduce the triangle count if the browser reports that.
Can I convert STEP or STP files?
No. STEP and STP are CAD solids, not triangle meshes, and this tool does not include a STEP kernel. Export a mesh OBJ from the CAD app, then convert that OBJ.
Can I convert a PNG or JPG to STL?
No. This site does not turn images into STL. It converts Wavefront OBJ meshes only. A photo, logo, or heightmap needs a different workflow in a modeling tool before you have an OBJ to bring here.
Do I need an account?
No. There is no signup, no paywall, and no usage cap in the app. The binary STL download is available as soon as the mesh converts.
Does conversion work offline?
The mesh path does not contact a server. After the page and converter scripts have loaded once, you can convert a local OBJ without a network connection. The first visit has to download those static assets. This launch build does not include a service worker, so a hard reload while offline can fail until the assets are cached again.
Which axis is up?
Blender OBJ files are usually Y-up. Slicers are Z-up. The default setting rotates Y-up models so the former up axis points to +Z, then optionally sits the mesh on Z = 0. If your export is already Z-up, switch the up-axis control so it is not rotated twice.